Here I am Using a Power Supply, current limited to 4 amps, but this is a nominal current. The amount of current will determine how fast the etching goes. But it will also determine how hot the solution gets! Too hot is a problem! Additionally, too much current will result in poor etching. See notes below!
A simple tank can be set up as in the picture below.
I am using Old Sulphuric Battery Acid, Diluted 4 to 1 with water! This concentration, as well as spacing between electrodes and plate sizes, All determine current draw at any specific supply voltage! Most Other kinds of Acids may be used, but Sulphuric Acid is quite common. And usually available for Free from places that Recycle Car Batteries as they need to remove it before processing the lead.
Connect the Circuit board to the Positive lead. Connect the Collector Plate to the Negative lead.
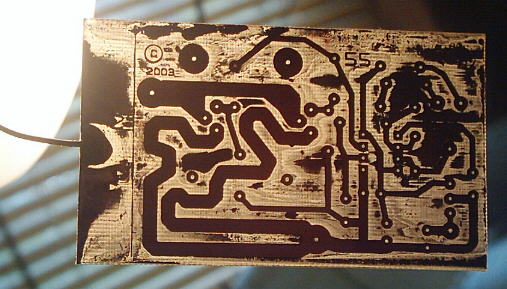
Reverse Plating can continue until most of the copper is removed from the board. As the copper gets etched away to almost nothing, the etching will automatically come to a stop. See the Electro-Etched Board below! This is the circuit board with a light behind it to show the small amount of copper left that still needs to be removed by a regular method!
Once you are at this stage, you can now "Finish" the board in a "Ferric Chloride Solution".
Important Notes
1)While this process isn't practical for the person that does one board per month, it will be for those that do quite a few boards.
2) The Wire Lead soldered to the Circuit Board is an Enamaled Wire. The Enamal and Solder will protect this wire from being etched away!
3) The Collector Plate (NEGATIVE) Electrode I am using is Stainless Steel, Because it stands up better over time! But almost any type of metal plate can be used! The PCB connects to the POSITIVE Wire.
4) It is recommended that this process be done in a Well Ventulated Area as there are some toxic fumes being given off into the air.
5) The Acid solution can be Re-Used over and over again.
6) It is useful to determine a good current level for etching with your particular solution. Once you have successfully etched a board, Divide the current by the area in Sq Inches. This will give you a Nominal Operating current "Per Sq Inch" of circuit board. You can now easily and relialably etch any size of board by multiplying its Sq Inches by this figure.
7) As I stated above, I have been using this process for over 25 years but in that time I have never seen this process used anywhere else. I don't know why, because in a commerical production I believe it could save lots of money and be more Enviromentally Friendly, even if it does add another step to the process.
8) I was also asked this in a few e-mails. No, It is not very practical to salvage the copper, using this solution. The copper deposits off as a brown sludge. If a Proper Plating solution was used, than you could get good copper deposits resulting, but this is much more expensive and requires temperature control as well.
8) As an additional aid for some of you: Instead of using the "Tin Solution" to coat your boards, I would suggest you look into an "Electrolysis Nickel Solution". It does a MUCH BETTER JOB and Does Not Oxidize like the tin does. It is also a Good Electrical Conductor and adheres to the solder very well.
Enjoy!

Click Here to See:
An Electro-Etched Board