How to Solder Circuit Boards Properly,
and Make it Stick and Conduct!
This is Especially useful when Re-Soldering an Older, Tarnished Circuit Board.Origionally Created: May 2003 Revised Feb 2009
Hopefully I will cover most details of this process!, All Feedback is Welcome
This is Specifically being Written to help the Newbe Hobbiest. But it may help others as well. It is NOT a Complete Guide for all Soldering Practices. (That could take a whole book!)
Having put a number of Projects on my site and Personally seeing some of the resulting boards, it has come to my attention that some people need a definate guiding hand in How to Solder!
On Numerous Occassions I have sent out Free resistors and small circuit boards for people to practice soldering on. But unfortunately that gets expensive and does little in actually showing the person how to do it properly.
Hopefully This will Help!Besides, I now have Very Few if Any, Spare Boards to give away!
Some Rules to Get Good Soldering Results!
WASH YOUR HANDS: Before and After.
Solder Iron: For this type of work I recommend a 25 or 30 watt iron with a reasonably fine tip for most PCB's.
Solder: I recommend a "Kester Solder" of .75 mm to 1.0 mm diameter. I prefer a Water Soluble Flux type solder (Kester 331) as you can wash the boards in Plain Warm Water to remove all Flux Residues afterwards.
Contrary to Manufactures claims that their flux is Non-Conductive, I have had many problems with this in High Gain Circuits and High Voltage Circuits!
Alternately a Kester #44 Rosin core solder is also good, but you need a flux remover to clean afterwards. (Acetone will usually work, but its Expensive and Flammable)
The PCB: It should be Bright and Shinny Copper. If Not, Clean it. An Eraser like this works good on Small areas.
"Use a Pink Eraser"

When Soldering the board, Avoid touching the Copper with your Fingers. Sweat and Grease from your Hands will Contaminate the surface, Causing Poor Connections.
Cleaning Parts: Unless all parts are Clean, Bright and Shiny, And Grease Free, You will not get a good solder connection! I suggest washing your Hands first, then the board with an "SOS" Pad, But make sure you rinse it good with warm or hot water. Than dry it immediately with a clean cloth or paper towel!
Additionally clean any parts that are oxidized. I use a very fine 400 grit Emery paper.
"Cold Solder Joints" This is a Connection that doesn't make Good Electrical Contact! Can be a Real Problem and can occur immediately or a year afterwards! Finding them is "Tons of fun"!
The Soldering Tip: The Soldering Tip must be clean and well tinned with a thin coating of fresh solder. It should appear Bright and Shiny. Not Black and Pitted! It is also important to wipe it regularly to keep it that way! Either use a Damp Sponge specifically designed for that purpose or a piece of Damp Paper towel will work.
Now the Soldering:
DO NOT APPLY SOLDER TO THE TIP, For Soldering Purposes!
I suggest placing the tip against one side of
the wire to be soldered and pressing firmly against both the wire and the
board to Induce Equil heat into both. Than Apply the solder to the opposite side!
The heated wire and copper on the board will melt the solder and it Should
flow very uniformly around this solder joint, quite quickly!
Do not heat parts for extended periods or you will damage them!
Soldering Bridges:
Be careful when soldering pads, especially those that are close together.
Sometimes a solder Bridge will occur, joining two pads together.
This is Particularly common to happen on soldering IC Pads.
When this happens it is often hard to tell if it is not supposed to be there or not.
And will short that part of the circuit! Not Likely, but if you have a
Desoldering Iron you can suck up the excess solder. If not, Solder wick,
or a damp cloth, or a small damp brush all will work to clean it.
Removing a Part and Replacing it:
There are numerous ways to do this, including Solder Wick and Solder
Suckers of all types. But Quite often these result in overheating the board.
Particularly useful for 2 or 3 lead parts. Eg: Transistors, cap or Resistors.
One method I have adopted is to quickly heat up the solder, one lead at a
time and just pull out the part.
Than to "clean out the hole", I use a medium sized Sewing Needle.
First, place it's point over the hole, On the Solder Side,
and while pushing down heat up the solder a bit on one side of the needle.
The Needle will go into the hole but the solder won't stick to it.
Remove the iron and let the PCB cool for a few seconds and than pull out the needle.
Clean the soldering tip after every hole to remove Excess Solder. This will usually
leave a nice clean hole and when you replace the part, only a tiny bit of new
solder (with flux), is needed to make a good connection.
Because all pressure used in this process is pushing the copper towards the board it rarely causes the copper trace to lift up. Also, only minimal heating is required.
When Soldering and Unsoldering, LOTS OF PRACTICE HELPS MAKE PERFECTION!
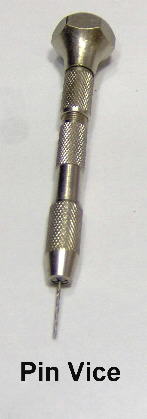
A "Pin-Vice" can drill holes.
Click on these links below to see more Pictures:
Some Enlarged Pictures of Placement
A Good Solder Joint!: Should be Bright, Smooth and Shiny!
A Good and Bad Solder Joint!
I am having trouble getting a "good picture" of a "bad joint"
"MORE, Still TO COME"
On the other hand, quite often I use a Weller 100/140 watt gun to solder
Circuit boards, even on surface mount!
But I've had over 40 years of practice in soldering and know how much heat to apply.
All Imformation in this Article is "Copyright protected".
Chemelec
*Copyright © 2003, 2004*